Tuesday, September 17, 2013

Compassion--for Ourselves

I recently read a post titled, "Moms, when are you going to learn? I am not supermom."  Since I'm not the cussing type (Read: no judgment.  We're just different), I am posting an edited version for delicate eyes.  ;-)

I appreciate the reminder from Michelle that we all have different strengths and priorities.  As my friend Shannon* mentioned today, we are all unfinished products. 

I admit that I have been afraid to talk about things I'm frustrated or excited about, proud of, or at my wits's end about, because I'm afraid I'll be insensitive to someone for whom that area may be a great strength, a sensitive spot or a challenge, or not in their ability at all.  Or in their ability, but not mine!

But from this article I really see what I already feel, which is that we can be such a source of strength to each other as women if we are sincerely happy for each others' strengths, and choose not to nit-pick or criticize others for being different.  What may work for me might not work for you, and vice versa.  And that's OK.  :-)  Let me learn from you what I can, and you from me, and still keep our individual identities, hobbies, & priorities intact. 

In short, don't judge (condemn) people who live differently than you.  Hope that they are being as compassionate to you as you are being to them, recognizing that we're all making decisions based on what we feel is best for our families.  

And MOST IMPORTANTLY, stop being so hard on yourselves!  I even worried that just by editing Michelle's post (someone I've never met online or IRL), I could offend her for changing the original content of her post.  We stress about so much, all the time. 

We compare our known worsts against others' perceived bests.  We often compare our reality to snippets of several other people's best strengths, thus comparing ourselves to an impossibility, one that we could never achieve.  That's the best way to make us feel inferior and keep us from being normal, albeit imperfect, moms.  Wouldn't it be much better if we were happy normal imperfect moms, instead of depressed normal imperfect moms?  And yes, I'm definitely taking notes from my own suggestions.  It's so much easier to dish advice than to act on it!

So, now that I already gave away the point of the post, here it is:

 ******************************************************
"Moms, When Are You Going to Learn?"  By Michelle from Ohio.

Look, I know the areas in life where I excel.  It unfortunately doesn’t involve me being a size two and wearing the most. stylish. boots. you ever did see.  I will not be doing a triathlon, I’ll be the one over there handing out water and cheering you on while eating a muffin.  My house isn’t ever company ready.  Just move that pile of Legos, I will make dinner.  I can make you laugh, I can make you think.  I am a great friend. . .I like the woman that I have become. . .”
My name is Michelle and I throw “Pinterest worthy” parties for my children.
I don’t think this makes me a [bad] mom, a superior mom, or that I have too much time on my hands.  I assure you, I do not. 
I also don’t think it makes you a [bad] mom for NOT throwing parties like that for your children’s birthdays, having a spotless house, and working full time.  I hope you’ll afford me the same kindness when I am braless in the drop off lane at school wearing pajamas and you look like you’ve had twelve hours of sleep, a blowout, and your makeup done before 9 am on a rainy Tuesday. . . .
We all have our own things, our gifts, and talents.  We all have our own priorities.  That they are different, doesn’t make them wrong.  We all are making the best of our collective situations, but it doesn’t mean we have to be [unkind] to each other. . . .
We’ve all become so defensive and annoying about parenting. 
Do I make my single parent friends upset when I talk about an awful day that I’ve had when Dave is traveling for work and I don’t have a break?  Do they think parenting is a breeze when there are two of us here?  {Because it isn’t.  Not even a little bit.} 
Does my friend Jen feel badly about showing off the hand sewn curtains and quilt she made for her sweet baby because I can’t sew for shit?  Does Danielle feel badly that she runs freaking marathons {with her feet!} and training takes time away from other things?  Does Kristina hesitate to Tweet that her kids are in bed by seven and she and her husband have some much needed alone time?  Does Lindsay feel awkward that she always looks gorgeous next to the other moms at school?  Does Emily pause before posting about finally, finally having her depression under control because she knows there are other moms still struggling?  Do you neglect to mention that you and your husband are going on a vacation alone and get to sleep in for a glorious week because your sister hasn’t been on a vacation in 5 years?  Does the mom from school buying Lunchables shove them under all of the other items in her cart when she sees you? 
Why are we even thinking about this [stuff]? 
Really, why?
I have friends who feel badly about giving up breast feeding early, about breastfeeding too long, about not being able to cook, about not being the stylish mom, and about being the mom that wants a break from her kids.  I have friends who feel guilty about sending their child to daycare, about not having the money to send their kid to camp, about not being athletic enough to coach their child’s soccer team.  I have friends who worry about not having a house out of Martha Stewart Living.  I have friends who feel like the frumpy mom, the single mom, the working mom, the stay at home mom, the mom that wore the wrong thing, the disorganized mom, the helicopter mom, the type A mom, the young mom, the old mom, THAT mom. 
I have friends that worry that they are the only ones who aren’t Super Mom. 
No one is Super Mom.
Not you.  Or you.  Or even you.  Certainly not me.  We just have different priorities.   
My husband would argue that maybe shaving my legs and slapping on a little lipstick could take precedence over printing and organizing 350 school year photos for the kids in Finn’s class. 
But Davester, I’m NOT Super Mom! 
You want to be a crunchy organic vegan mama championing the fight against GMOs?  Do it.  You want to be the. . .CEO of an empire so you can hire the best nanny money can buy?  Step right ahead.  You want to feed them takeout every night and spend that time playing with your kids?  Go for it.  You want to wear full makeup and heels on that field trip to the apple orchard?  More power to you sister.   You want to put those kids to bed at 7 pm every night and have some time to yourself?  Rock on.
Just be a good parent, love your kids, and do the best that you can.  [Don't be a jerk] to those who don’t share your choices. 
More importantly, quit being a [jerk] to yourselves.
******************************************************

*I just loved my friend's post about us all being unfinished products, so I'm including it here.  Without her permission.  Ahem.  Here it is: 
"Hoky thought for the day: Was talking to a friend today who kept apologizing for her house mess. Funny thing was, I love her and all her mess. I don't see it and think less of her, on the contrary, I know she's always out helping someone and busier than I can even fathom. Made me think about how often we apologize for or want to hide those things that show our humanity or weakness. I know I want to be a better person and learn and grow, I think that's what I'm here for. But I'm also here to love and serve others. How can I if I can't see their need? Or adore their silliness? I love my friends for all their crazy, I admire how hard they work to be good people and overcome their weakness. They inspire me to be better and help me along the way. If they all looked perfect and acted perfectly all the time, I'd just feel stupid. We're all unfinished products here, though some seem way farther along to me than others. Just thought today I'd try to accept myself and others for the potential we have and try harder to overlook the weakness and the mess. 
Sappy moment concluded."

Monday, September 16, 2013

Parenting: Easy to have opinions about. Hardest to actually do.

I just read a post titled "Dear parents, you need to control your kids. Sincerely, non-parents.” While the article itself has some important points, I wasn't a huge fan of the way he ridiculed a ridicule-er, so I have summarized those important points below.  (Seriously, this IS the short version) ;-)

While at a store, Matt Walsh (a parent himself) heard a toddler in the middle of a tantrum. His first thought: “It happens. Toddlers are notorious for losing their cool at the most inconvenient times. Nobody likes to hear it, but it happens. . . It’s humiliating and emotionally draining, but what can you do? . . .[I]t’s not always that simple; maybe you don’t have time to shut down the whole operation just because Billy’s gone nuclear.” 
 
When he ended up coming across the woman, it looked like the child was told “no” to a purchasing a sugar cereal. He further thought, “She could bribe her kid into silence, but she was sticking to her guns. Good for her, I thought. Sure, if she’d only meet his ransom demands, my. . .purchasing experience would be a bit more pleasurable, but I was rooting for her nonetheless.”

Then Walsh ran into a 20 yr old fan.  The fan turned to him loudly enough for the mom to hear, and in a superior voice remarked, “Man, some people need to learn how to control their [blanking] kids,” to which Walsh told the fan to mind his own business.

After the offended ex-fan left, Walsh witnessed the explosive kid bump into a display, knocking items onto the ground. Walsh started to help pick stuff up, but the mom said she wanted her son to do it, since he had made the mess. Walsh told readers, “A lot of people would buckle under the pressure of having sonny going psycho in aisle 7, while, seemingly, the whole world stops to gawk and scrutinize, but this lady stayed cool and composed.”

Here's the point of this experience:

Why do people calculate that
MISBEHAVING CHILD = BAD PARENT?

Instead, it should read: MISBEHAVING CHILD = NORMAL CHILD
or
MISBEHAVING CHILD = CHILD PUSHING BOUNDARIES

I have been hurt by this before.  A woman who didn't think I could hear her turned to an employee, telling them how horrible my children were and that I was "letting" them get away with it.  She knew nothing of the context of my situation.  Even though knew the context, it still really hurt my feelings and made me question my worth as a mom.  Even if there had been no context to the situation, though, I was being a mom.  It's an imperfect experience that others sometimes witness because we moms don't normally hide out in our homes just to appease others from witnessing our kids be normal, especially since they could never learn to be contributing members of society that way.  And because we eventually have to make it to stores to replenish food and household items to take care of said kids.

Walsh went on to explain that the math doesn't work with this calculation, since a kid “going berserk in a grocery store doesn't indicate the quality of his parents, anymore than a guy getting pneumonia after he spends six hours [poorly dressed] in the snow indicates the quality of his doctor. Grocery stores are designed to send children into crying fits. All of the sugary food, the bright packaging, the toys, the candy — it’s a minefield. The occasional meltdown is unavoidable, the real test is how you deal with it. This mother handled it like a pro. She was like mom-ninja; she was calm and poised, but stern and in command. . . . [A] non-parent doesn’t realize that, unless they plan on using a muzzle and a straightjacket, there is nothing they can do to tantrum-proof their toddler.”


Walsh concluded his post with some profound words: 

“Parenting is the easiest thing in the world to have an opinion about, but the hardest thing in the world to do.”
 

He then gave an example: “You shouldn’t scrutinize parents when you aren’t one, for the same reason I wouldn’t sit and heckle an architect while he draws up the blueprint for a new skyscraper. I know that buildings generally aren’t supposed to fall down, but I don’t have the slightest clue as to how to design one that won’t, so I’ll just keep my . . . architectural opinions to myself.”

My point of summarizing this article and posting about it?  Let us all be more compassionate to each other, as parents, as community members, as human beings.  It's so much easier to voice opinions about how we think people should be living their lives than to actually be in their shoes ourselves.

Wednesday, September 11, 2013

Head Lice Advice

There is NO shame or disgrace in getting lice.


Gasp!  You have discovered lice!  Nooooooooooooooooo!  Say it isn't so!

Lice are annoying. Removing them is tedious and time-consuming; there is no magic cure.  But it is doable.  I have condensed a LOT of verified information off the internet, as well as included what I have learned by trial and error.  

Before you panic, print off this post to reference as you go through this realistic elimination process.  There are nine different sections:


YOUR BEST WEAPONS-- A Robicomb, your eyes and fingernails, hairspray, and a blowdryer.
Other handy helps-- Tea tree oil (TTO), head lamp, comb or nit comb, water spray bottle, seam ripper, shower cap. . .
IMPORTANT FACTS-- Knowing the enemy; its life cycle, how it spreads, & how to get rid of it.  Also, the equally important task of delousing & maintaining lice-free linens, bedding, carpets, furniture, and vehicles.  This sections is also helpful for dispelling many lice myths.
TREATMENT-- A combination of using a robicomb, some TTO, manually removing nits one at a time, and then a follow up of how to keep hair up, off the neck, and impermeable to lice/nit transfer while your family is in the process of eliminating the lice infestation.
Manual nit-picking technique--Most critical part of the process.  Day one of this technique will be the most tedious & thorough, but also give you the greatest satisfaction.  This technique is not only worth every minute, it is crucial.
RULES OF THUMB--Who to notify and why, when and how to appear at public functions, and how to treat non-affected family members.  A MUST-READ!!!
Why I recommend against store-bought treatments and some natural treatments--Why I wish I had this post from day one, and what I learned during a very steep learning curve of trying a lot of other things first.
How the Robicomb works
Miscellaneous-- Extra links, pointing out that I am not compensated for promoting the robicomb or TTO, my own testimonial of my method, and an invitation for input that can better this post.

YOUR BEST WEAPONS:
 --Robicomb.  Worth.  EVERY.  Penny.  Just under $30 at a local CVS, Walgreens, or one of the stores listed here. (See "How the Robicomb works" section for use; use on DRY hair only.)

  --Your eyes and fingernails.  Visually inspecting an affected head and manually hand-picking out individual nits, one at a time, is the BEST removal process and defense against re-infestation, whether or not you decide to use a store-bought and/or natural treatment.  (See the section "Manual nit-picking technique" below)
-- Hairspray, then a blowdryer.  Buy cheap hairspray and use lots of it.  Keeps lice from being able to move around, and makes head less likely to be able to transfer lice either to or from head.  Then use the blow dryer on the already-thoroughly-sprayed hair. Helps seal in hairspray.  (Blow-drying on its own does not kill lice or nits.)


Other Handy Helps:
-- Tea Tree Oil (TTO).  Also known as melaleuca oil.  Any undiluted brand will do.  Found in pharmacy sections of stores, and runs between $4-8.  It helps stun and slow mobile lice, and slightly helps loosen nits from the hair shaft.
-- Head lamp. Any type will do.  Really helps to see nits at base of scalp.  They are tiny.

-- Superfine nit comb.  If you want a nit comb, I recommend the one linked here. It's more useful if you yourself have lice, and can't visually inspect your own head.  Also necessary for longer hair.  Basic plastic nit combs are almost useless.  A specific metal nit comb is a tool for trying to "catch" nits &/or lice in its tines.
Still, a regular comb is helpful not only for separating sections but also as a tool to push little bits of hair one way or the other while inspecting the head. (But a regular comb can't "catch" lice or nits in its tines)
-- Seam-ripper.  Any type will do.  Helps to pick lice & nits out of nit combs.
-- Shower cap.  Nice for toddlers & young children to wear for the first day or two after discovery, since their little unpredictable heads bob all over different surfaces & other siblings.  My three year old only needed 3 serious spanks before he diligently kept his shower cap on.


IMPORTANT FACTS about head lice:
-- Lice are no respecter of persons, just one of those things that get passed around. They are highly "contagious" because when transferred from one head of hair to another, lice are immediately "home," and a pregnant louse can begin laying eggs within moments of being on a new host.
-- Nits = eggs.
-- Nymphs = lice babies and teenagers; they are mobile.
-- Adult lice = also mobile and can procreate. “Lice” often refers to mobile lice, or all forms of lice. Lice cannot hop, jump, nor fly from heads or clothing/bedding/furniture. 
--Lice transfer three ways; direct head to head contact, direct head contact with something & then direct contact from that something back into the hair, or direct contact from that something into another person's hair.
-- Nymphs and adults are mobile within a head of hair, but almost completely immobile on carpet, furniture, bedding, etc and cannot infest inanimate objects or pets.


-- Nits can be less than one-third the size of a sesame seed, and are the same size and shape as each other, colored tan, brown, and/or white. Sometimes they also look translucent in between the tines of a nit comb. They are usually at the base of the scalp, and do not come out of the hair easily.  Dandruff and other dirt, lint, etc, are different sizes, and come out fairly easily.  Using the tip of the fingernails of your thumb and index finger is the best way to grasp a nit and pull it off a shaft of hair. (See "Manual nit-picking technique" section)
-- Nits that are currently on the head are rarely affected by treatments that kill adult lice. They hatch 7-10 days from being laid, and can lay eggs as early as 7 days after they've hatched, so daily robi-combing & nit-picking is important to catch any that hatch, even after previous lice have died off.  This is CRUCIAL to avoiding a re-infestation.
-- Nits and lice can only survive in specific temperatures (for nits, the warmth at the scalp), and with multiple meals a day (for hatched lice). If they are transferred to an inanimate object, nits can't survive for more than a few hours, and lice, 24-36 hours.  Nits also can't hatch on carpet, furniture, etc.  As long as they aren't transferred back or to other hair in that time, they die on their own.
-- Preventative measures include not sharing combs, hair clips, jackets, hats, etc, and avoiding resting heads on others' shoulders, hugging, or wrestling (i.e. children playing around).
--Vacuuming in areas where heads have been (like couches, computer chair backs, and vehicle seat backs & head rests) helps pick up any stray nits or lice.
-- In between regular washings, throwing used towels, pillows and pillowcases and other linens in the dryer on hot (at least 135 degrees for 30 min) kills lice.  Bagging household items like stuffed animals for a week or longer helps prevent heads from coming into contact with those items until their heads are clear.  Bagging laundry as you're working through it on the first day of discovery may also put your mind at ease a little more.

My Home TREATMENT: (the one that worked!)
1. Remove and change clothing and follow robicomb directions from "How Robicomb works" section to robicomb completely dry hair.

2. Shower w/ TTO in shampoo & conditioner, then sit down for a very thorough, wet-hair nit-picking session (See "Manual nit-picking technique" section). This is critical because it's where you will get most of the nits out, hand-picking them out one at a time.  If any nits are missed and hatch, they will re-start the cycle. Just the thought makes my head start itching again! 
I wore a headlamp so I could see close to the scalp as I did this, kept a water spray bottle close to keep hair wet as I went, used clips to keep  sections of hair separated, and had a comb as my guide to move hair about and closely inspect the scalp. 
It easily takes more than 2 hours to do this and is a pain, but is absolutely worth it if you want to avoid pesky re-infestation.  You also should only have to be this thorough once. 
After that the next couple of weeks is checking for missed nits and hatching lice, mostly with the robicomb.
3.  Disinfect nit comb, hair ties, and hair clips after each nit/lice combing.  Boil water, then take off stove and let items sit in it for 10 min.  After using normal hair combs, hair accessories, and/or brushes, disinfect as well.  (Follow robicomb directions for cleaning robicomb; do not submerge/boil it)
4.  Once hair has been thoroughly nit-picked, put gals' hair in a ponytail and bun and hairspray the heck out of it.  Gel guys' hair and then hairspray the heck out of it as well.  For both guys & gals, blow-dry the hairsprayed head to seal in the hairspray.   Skipping this step can be disastrous to you or others if you want to effectively eliminate further lice transfer.
5.  Robicomb daily for at least 8 days.  Do NOT get lazy about this.  After those 8 days, switch to every few days as a preventative measure.  Even after lice seem gone for more than a week, do weekly checks for awhile to avoid possible re-infestation.  At least weekly, check non-affected heads as well.  This has saved us more than once from others getting full-blown infestations, and has also saved us when family members have ended up coming back in contact with others who gave them the lice in the first place.  It's the best way to quickly catch any new lice that get transferred to a head, or hatch there.  I can't stress this enough!
6.  Throw used towels and bed linens (especially pillow cases) in dryer on high for 10-30 min. No need to wash everything daily.  But be sure to trade out pillowcases daily for at least 2 weeks.  See the "Important Facts" section for more details on how to keep your environment clear of lice while ridding heads of it.  Keeping pillowcases, vehicle seat backs, carpets, couches, and bedding free of lice is another step that can't be skipped, or live lice will just keep transferring back and forth from heads to stuff, and stuff back to heads.

RULES OF THUMB :
1) NOTIFICATION--Knowledge Is Power! Let people know you've discovered lice, especially people you or your children have been in contact with recently; jobs, schools, churches and community/sports groups. This is a protection to them AND you. If they are also checking heads, being extra cautious about hugging, sharing combs, etc and treating any possible lice, YOU have a much lower chance of getting re-infested.
2) BEING IN PUBLIC--Adults that plan on being in public: keep hair up, well hair-sprayed and avoid hugging, even when no mobile lice are present. Children and teens: keep hair up, well hair-sprayed, avoid hugging, and avoid public things like school, church, contact sports, and playdates.  This is only fair to you and everyone around you.  The rule of thumb in many public schools is that children and teens may return after the first day that no mobile lice are found.  A few schools have a no-nit policy as well. 
3) NON-AFFECTED FAMILY MEMBERS do not need to miss school or public functions, but should be checked every few days (A robicomb makes this a much quicker & easier process!). It's also a good idea to have gals pull up their hair & hairspray it, and guys gel hair & then hairspray it, lowering the odds of getting or sharing lice.  It may help you and them feel more at ease if they also trade out their pillowcase daily for one that has been washed, or one that has at least been in a hot dryer for 10-30 min.

Manual (by hand) nit-picking technique: (important regardless of chemical, natural, or home treatment)
-- For someone else's hair, use a headlamp and start going through it slowly and methodically, doing about 1 inch by 1/8th of an inch sections at a time.  Pick any nits out manually, by hand, one at a time, by grasping them with the tip of your fingernails of your thumb and index finger and pulling through the full length of the individual hair shaft.  The nit comb is also useful for longer hair, but individually picking out nits by hand is most effective.  


-- Nits are almost always at the base of the scalp, each one on a single hair shaft, and are easy to miss, which is why a headlamp is helpful.  If they are just laid, they will be right at the base of the hair shaft.  If they have been incubating for any amount of time, you can tell for how long by seeing how far along the shaft they are.  So when you are looking for nits, be sure to look from the base of the scalp, out at least an inch down the hair shaft.
--If hair is long, section wet hair off with clips and, wearing a headlamp, start going through it just as slowly and methodically as with short hair.  Visually check for and hand-nit-pick any nits in each section. Then use a superfine nit comb on each section by combing against scalp, then pulling comb down through the full length of the hair.
-- For long hair, and for your own hair, check the nit comb after every stroke. Use a seam ripper to get lice off the nit comb, and an old toothbrush to help brush out other bits of dandruff, etc from comb. Since nits and lice can be smaller than a sesame seed, checking after each stroke helps protect from accidentally putting any lice back into hair.  For lice in one's own hair, daily dry-hair robicombing in between thorough wet-hair combing is even more important, as is keeping hair up, well hair sprayed, the the hairspray well blow-dried.
-- Note for longer hair: braiding hair to keep it "up" is often counter productive, since lice can think they're laying eggs at the base of the scalp that, when the braid is undone, can be anywhere from 2-8 inches down the hair shaft, making it much harder to find and remove all nits.

Don't despair! You can do this!   

Why I recommend against store bought and some natural treatments:I recommend against purchasing an over-the-counter lice treatments like NIX or RID.  They're not fully effective, anymore than what you'll have to do anyway.  Crazy, right?  You do NOT need a chemical treatment.  Seriously.  I have also found several natural "treatments" to be simply ineffective, from mayo or olive oil, to listerine or vinegars.  That doesn't mean there isn't one out there that works. Just that I'm not willing to deal with lice for months while I try to figure out which homeopathic thing actually holds up to its claims.  (I've included some links of possible DIY treatments down in the "Miscellaneous" section if they float your boat)

You may be thinking I'm the one who is crazy, but I'm telling you from experience.  Spend your money & time on the robicomb & manual nit-picking, not lice shampoos or solely natural remedies. I did so many things, like soaking hair in olive oil overnight, covered by shower caps, and submerging heads in water for minutes at a time, trying to "drown" mobile lice.  No "one" thing was a cure-all. 
Putting mayo or oil in hair was messy and no more effective than a quick robicomb, and was suggested to stay on hair for a minimum of 8 hours, under a shower cap.  Wasn't worth it, and we did it multiple times. 


How the Robicomb works:
The robicomb uses a double AA battery.  It emits a small electronic pulse that "zaps" lice.  The coated tines of the comb protect the affected scalp from getting zapped.  This comb ONLY works on DRY hair.  Be sure to read and follow included directions and watch the short video on how to use the comb properly. 

The robicomb emits a hum that essentially lets you know it's making a circuit.  If the hum stops, the comb has either encountered and zapped a louse or nit, or gotten some dandruff in it.  Turn the comb off, brush out the zapped stuff, and then start using it again.  When your little yellow brush thingy wears out (and it will), grab an old toothbrush to take over the job.  The hum used to annoy me like crazy, but it is now music to my ears because it means it hasn't encountered any more lice!
Do realize this comb is not meant to be used, or cleaned, like other nit combs.  Its purpose is not to actually pull out lice or nits, but to zap them so they either die immediately, or die within hours, not to get them off the head.  So the comb doesn't need to be boiled like other hair items; follow included directions on cleaning it.

The robicomb makes the first head check much more effective, because it can get the adult lice faster than they can run, and those little buggers are FAST.  That's why I like doing it before having the person shower and sit down for the big hairy manual nit-pick session.  And after that, daily robicomb head checks for mobile lice so much quicker. 
Realize that the robicomb takes a little getting used to, and that it is possible to "zap" the affected person's skin, especially over uneven surfaces, like around the ears, and also at the nape of the neck.  I practiced a little on my head first.  Also realize that it doesn't zap all nits (even though it claims to), so don't depend on it as a cure-all by itself.  The few harmless scalp zaps are the lesser evil over the painstaking hassle of hours and days and weeks of manual wet-hair inspection and lice/nit removal.

Miscellaneous:
--I get no kickbacks or compensation for promoting anything on this blog, except for the great satisfaction of knowing others can be much more knowledgeable, much less overwhelmed, and treat lice faster & more effectively!
--My own testimonial: I've compiled info and attempted lice removal so many ways, and then finally the way I suggest here.  There's just no comparison for really removing all lice & nits.  I only wish I had this to read right when I had started.  It would have shaved at least 2 months off of the time it took us to become lice-free.  
IF you
1- diligently follow robicombing methods, 
2- thoroughly remove lice/nits by hand, 
3- keep hair up, hairsprayed, & blow-dried, 
4- diligently follow up robicomb head checks, and
5- diligently trade out pillowcases and keep home clear of transferable lice, 
you might be lice-free within a few weeks!  
Just be sure to still do regular head checks after that in case someone comes back in contact with where they got the lice in the first place.
 --Here's a great link with the tagline "Head lice; a lousy problem"  Really worth reading to put your mind at ease about many ways lice CAN'T be spread:  Myths and Facts about Head Lice

--Here are some other links for die hards who just really want an "all natural" lice shampoo treatment.  I have not tried these so I can't verify their claims:
DIY shampoo, peppermint & TTO oil, etc

DIY shampoo, coconut oil & apple cider vinegar
Sprays like this claim to help, and the home DIY version of this is salt & water.
If any of them (or something else) works for you, please post your successes in the the comments section!
--I love feedback.  If you can add to this post, please comment and provide links, and if you find errors, please also post links and/or provide reference material so I can update my post. 

Friday, January 11, 2013

Sunday, October 21, 2012

DYI (Make Your Own) Cake Pan


I've been meaning to write this post for, well, just FOREVER.  I have not found a good Google link nor YouTube video to explain how to make your own cake pan.  My mom made custom cake pans for her six children for almost every birthday because:
1) she could be creative in the kind of cakes we wanted, and
2) while time-consuming, we couldn't afford to keep buying shaped cake pans.  There are six of us siblings, so that adds up to a LOT of DIY (Do-it-yourself) cake pans.  Go mom!

It's a lot of work, but if you just have to have that peanut-shaped cake, or a map of your state, I think it's worth it.  Nathan was just baptized, and I wanted to make a CTR (Choose the Right) shield-shaped cake.  So here goes.

HOW TO MAKE YOUR OWN CAKE PAN  -- (DIY Cake Pan)
My mom's version

Tips before you get started:

  • Make sure you measure the inside of your oven.  Do not make a base that won't fit.*  The easiest way to do this is to pull out a rack and measure the width and height.  Easy peasy.  But also take into account whether you want your cake-with-base to fit in the freezer until you're ready to thaw and frost it, and/or the fridge until you're ready to serve it.  If you plan on doing either of those, you need to measure in your fridge and/or freezer as well.
  • Do not make a shape that is too detailed with narrow parts.  Pick shapes that are generalized around the edges.  For instance, a violin cake might completely overcook at the neck.  The Eiffel tower could burn up at the top point and down at the legs if you make them too narrow.  And so on.
  • Keep in mind how much cake you want to make.  With this technique it's easy to make big cake pans because you're not confined by the size of a store-bought pan.  But just realize this means 2+ boxes of cake mix when you're ready to bake, as well as additional frosting.  If you make a bigger cake, it means longer cook times, too.  The cake pans my mother and I create usually require 2-3 boxes of cake mix.
  • If your cake is a shape where the mirror image will look backwards if flipped, be sure your original base is a flipped image.  For instance, this shield cake looks the same either way.  But most state-shaped cakes would need to be baked in a cake pan that looked like the mirror image since a cake is flipped after baking.  More on that later.
  • Lastly, scroll through all these directions first so you have an idea of the logistics, before you start your own process.  Better to read through it now than to become desperate in the middle of a step.

What you will need:


  • a copy of your shape, be it a car, star, apple, strawberry shortcake, smurf, skateboard, etc to either look at or trace.**
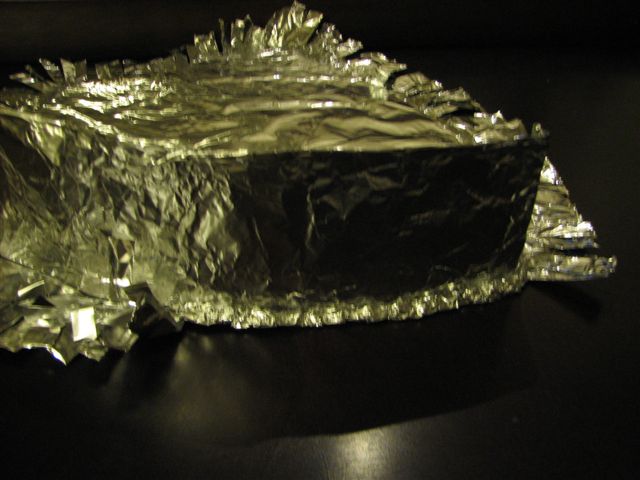
  • heavy duty tinfoil that is 18" wide; see picture above  (Normal tinfoil is 12" wide)
  • masking tape
  • scissors
  • Cardboard, enough for you initial base, then for a final base that is at least 2 inches bigger than the original.  (Or your final can just be a rectangle big enough to set your cake on.)
  • Exacto knife (box cutter)  [In a pinch you can use heavy-duty scissors]


Ready to start?

1. Draw, grid, or freehand your shape onto your cardboard at the size desired.  Don't worry about penciling all over it or adding inner details; you'll be covering it up with tinfoil in a moment.

2. Cut out your shape with an exacto knife or scissors (the former is much easier, but the latter works in a pinch).  See steps 18-20 for instructions on how to cover the final base.


3.  Make multiple masking tape loops and place them all over your cake base:


4.  Pull out your heavy-duty, 18" tinfoil and take off a piece that's long enough to cover your base with at least a 2" berth.  Make two of these (you'll see why).  If you look at the picture above you can see I have mine sitting next to/under my shield.  You can also see that it wasn't quite wide enough, so I added another strip toward the top--notice that long piece of masking tape attaching two strips of tinfoil.

Once you've covered your cake base in masking tape loops, place the base sticky-side down onto your first tinfoil sheet.  I don't think it matters if the tinfoil is shiny-side up or down, but I'm OCD and lay mine down on the dull side of the tinfoil.


5.  Now cover the other side of your base in masking tape loops:


6.  Remember that second piece of tinfoil you made in step 4?  Now you're going to eyeball it and place it over this side of your cake base (I place mine dull side facing down), being careful to make sure it has a 2" berth on all sides when placed down. And if you lay it wrong?  Just pull it up and re-place the tinfoil until it lays right.  In the picture below you can see I am placing my top sheet of tinfoil over my base:


7.  Smooth the edges:


8.  Trim the tinfoil to conform to your cake shape, leaving a 1 1/2-2" edge.  Now both sides of your base are covered in tinfoil:


9.  Now for the part you're all wondering about--the sides!  Before you start this part, take some measuring tape and measure the perimeter of your shape (not including the excess tinfoil around edges).


10.  Roll some tinfoil out on your floor to the length of the perimeter + several inches.  I.e. if your perimeter was 3 feet, you would roll out 3 feet plus 4-6 inches.  I suggest cutting the length with scissors; trying to tear off 18 inches of tinfoil can end up making it rip inward, thus making your side a bit too short in some places.


11.  Ok, here we go!  Your tinfoil is laying out on your floor.  You are going to want to fold the top of the tinfoil down toward you hot dog*** style, almost in half, but leave a 1 1/2-2" edge at the bottom (I totally eyeball it).  Start on one side and slowly move across the tinfoil, folding until the entire length of the tinfoil is folded down.


11.  Now you get to do it again.  From the top of your tinfoil, fold down exactly in half, down to the bottom of your last fold, but not past the 2" exposed part at the bottom:


 12.  For this step, I have no pictures, because I goofed.  You are supposed to fold down the tinfoil from the top a THIRD time, in half, hot dog style.  I forgot, and so the sides of my cake were very high.  The third fold gives the side 6 layers, which makes the sides strong so your cake batter stays where it should.  = )

For the rest of the pictures, remember that your own sides will look half as tall as the ones in my pictures, and that YOURS was done right, and mine, wrong!  *grin*  I probably won't make another cake pan for another four years, and only then will I be able to take pics of following the directions properly.  IF I remember.  *sheepish grin*

13.  Just a little more prep work and we're ready to attach the sides.  Take yout scissors and start snipping little cuts about 1/2 or so inch apart along the exposed part of tinfoil  Do NOT cut into or past the folded tinfoil above.


Move along the entire length of tinfoil:


14.  Now you will also cut into the excess tinfoil around your cake base, snipping pieces there as well.  Try not to cut into the actual cardboard, but cut up close to it.  Remember you're cutting through two layers of tinfoil on this one.  Doesn't have to be perfect; we'll tape it all down later.  Continue all the way around your cake base.

15.  Ok, here's the moment you were waiting for!  This is hard to describe, so I'm including both pictures and video for this part.  Watch the video first, then look at the pictures.


Line up your tinfoil "side" perpendicular to the perimeter of your case base, so the folded-down edges and exposed flaps are facing you, NOT the inside of the cake.  Just try and line up a few inches at a time:


16. Take a doubled-strip/flap of tinfoil from the cake base, and a matching strip from the side, and twist them together, kind of rolling them up and twisting them at the same time.  Watch the video above if you're confused about this step.


In the picture below, I've taken away my hand so you can see the first two strips that I twisted up.


And in this picture, you can see the opposite vantage point.


And here is yet a third shot.  Remember, though, my sides are twice as high as they were supposed to be.  Yours won't be that high (that's a good thing).


Continue rolling up a gathered double-tinfoil strip from the base of the cake pan with a matching strip from the side, all the way around the cake pan.


Your sides will be nice and sturdy, but not so sturdy that you can't adjust them a little here and there.  And if you come to a sharp turn in the shape, I take the tinfoil side and crease it well; you can see this on the three "hard" points of my CTR shield cake pan, quite specifically on the picture below showing the top point of the shield:


 16.  You can do this step at the end, or as you go along.  It's the masking tape step.  Do NOT use duct/duck tape, use masking tape (even blue painter's tape doesn't stick as well; masking tape is my family's tried-and-true option for this part).  On the outside where you have been twisting up the tinfoil strips/flaps, you can run some masking tape over them to help keep them in place.

But the most important part of this whole venture is doing a good job with your masking tape on the INSIDE of the cake pan, the part between the side and the base.  If that isn't well-taped, your batter will leak.  I've heard horror stories, so I've always taped mine really well.  I even hold them up to natural light when it's daytime and make sure I can't see any pinholes.  I haven't had any cake pans leak yet.

I usually start with strips of tape that I sort of fold in half hot-dog style facing away from me (the inside of the folded-over part is the non-sticky side of the tap).  Then I let go a little so the tape takes on an "L" shape.  I line each side of the "L" up against the corner of the cake, so one half of the tape is going out flat against the base, with the crease right in the intersection of base and side, and then the other half of the tape is going up against the side.  Once I position a strip where I like it, then I bring one hand around the back of the side for pressure, and then use my other hand to smooth the tape down, both on the side and base so the tape adheres well:

Next I add another horizontal strip along the base, overlapping the piece that straddles side and base.  Then I add yet another along the side piece, also overlapping the middle, side/base-straddling piece.  Sometimes I'll also add a piece of tape vertically, folding it in half hamburger-style*** and placing it perpendicular to the horizontal strips of tape:


17.  So, you crinkle/twist/roll up the side strips/flaps on the outside of the cake as you go along.  When you finish and come back to where you started, there should be some overlap.  I uncrinkle some of my very first strips, then bring the overlap around the outside of the cake pan, and then take those strips from the overlap and rewrap them into the very first strips I had originally done.  Be SURE to tape down the overlap part on the inside, from top to bottom.

Voila!


Your cake pan is ready to be sprayed with non-stick pan spray and filled with cake batter.  You cook the cake by following the cake mix/recipe directions for the amount of cake you put in (I did three chocolate cake mixes for this cake; it was 17+ inches at its greatest height, and 16+ at its greatest width).  If you've already completed steps 18-20, skip to step 21 on how to remove the sides and "flip" the cake onto the final base.

FINAL BASE:
18.  You should have your "final" base ready for when your cake is done and cooled.  Or make it while you're waiting for the cake to cool.  = )  Remember back at step #2 when you made a base that was at least 2" bigger than your cake pan base?  Now's the time to pull that out.  It can be just a rectangle, or, in my case, I went with a bigger version of my original shape.

This time you don't need to cover both sides of the cardboard.  Just the side that the cake will sit on.  So.  Take your tinfoil out and pull out a sheet big enough to cover your shape, and then some.  Again, if you need to add a strip for more width, no problem.  Just be sure to tape the pieces on the dull side of the tinfoil.  You definitely want shiny-side facing up for your final base.

19.  Put masking tape loops on the face-up side of your cardboard, just like in step #3.

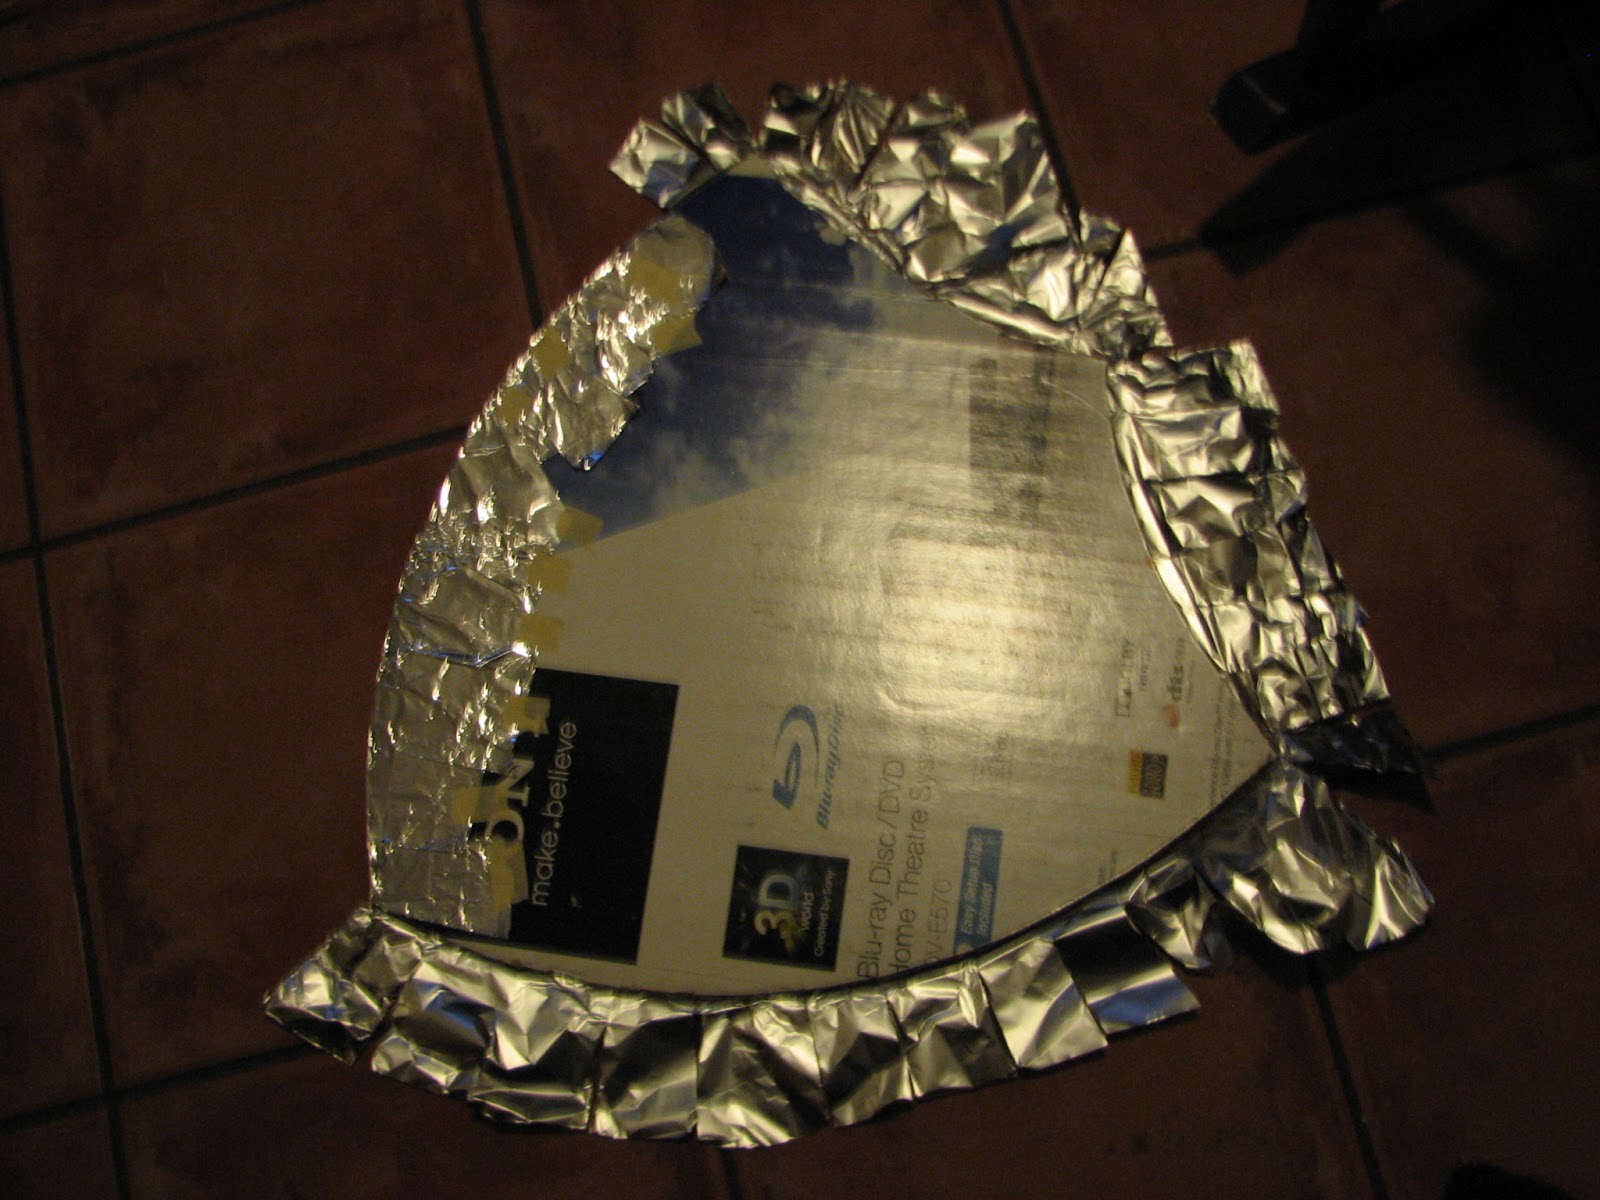
20. Take your piece of tinfoil, dull-side facing down, and lay it over your 2nd, bigger cardboard shape cutout.  Smooth down the edges so you can see where they are, and then flip the whole thing over, holding the cardboard and tinfoil together as you do.  Now all you need to do is pull in any of the excess tinfoil and tape it down onto the underside of the final base.  You can see I snipped the edges to make this easier to do:


And voila--here is your final base; your cake will rest on this base, and you will frost with the cake sitting on top of it:


21.  Taking off the sides.  Once your cake has cooled for at least 40 min, you can start to peel off the masking tape and pull off and/or unravel all the strips that hold the side to the base.  Go all the way around the base until your sides are off.  The masking tape will have changed color and the base will look cooked and crumby, but it's not your final base, so don't stress about it.

22.  BEFORE you flip your cake, you want to take a long frosting knife and level your cake.  I'm talking about the part in the middle that rises more than the sides and is a big hill.  Cut it off so that when you flip the cake, that middle mound doesn't high-center your cake.  If you forget this step, it means poking a lot of stiff frosting under the edges of your cake to hold them up.  = )  Also, corners may break off before you have a chance to frost.

"FLIPPING" the cake:
23.  I wish I had thought to have someone videotape me (or in this case, it was my mom, who baked, flipped, and frosted the cake for me) for this part, and I'm irritated that youtube also does not appear to have any videos showing this process.  There's an easy trick to it.  Do NOT lay your final base down on your counter, pick up your original base-with-cake-on-it and turn the whole thing over quickly (a disaster if there ever was one, plus it's impossible to get the cake to lay right where you want it on the final base).

Instead, have the cake-with-base laying on the counter.  With your non-dominant hand, place the final base upside down (face-down), gently, on top of the cake that is cake-side up.  Why gently?  So you can look under and see where the base landed, and if it has equal amount of edge all the way around it, or if it needs to be adjusted.  Remember, once you flip it, wherever the cake lands, that's it's final resting spot.  At least it is if you don't do this for a living.  So, adjust the final base, still upside-down on top of your cake, until you're satisfied with the placement.  Then, placing your non-dominant hand in the middle of the final base to give it good pressure, slide your dominant hand under the original base-with-cake, and then flip firmly but not recklessly, not too fast nor too slow.  Bring your non-dominant hand down onto your counter and slide your hand out from under the cake.  This way the cake is already touching it's final surface before it ever slips, giving it good pressure during the entire flip, and keeping it in place so it's right where it should be when the flip is complete.

24.  BEFORE you lift the original base off the bottom of the cake (which is now the top, since you flipped the cake onto its final surface), this is a good time to gently place your long frosting knife along the edge of the "top" of the cake (which was the bottom just moments ago) and the original base, gently separating any cake that might want to cling to the tinfoil of your original base.

THEN lift off the original base.

And there you have it!

25.  A couple of final tips, if you haven't frosted a flipped cake before.  First, the cakes are usually kind of crumbly.  It will need what bakers call a "crumb coat," or a base coat of frosting.  This doesn't have to be ultra-stiff, and it doesn't have to be colored.  It's just to seal in the crumbs.

Second, don't worry if frosting gets onto your final base around the edges and looks messy.  Once you're pleased with your frosting job of the sides and top, it's easy to wipe off any excess frosting from the shiny tinfoil, right up to the edges of the cake.  And for finer fixes, use your finger along the edge of the cake to carefully mold the frosting toward the cake and fine-tune your frosting to look more uniform on the edges.

Lastly, if you want to put fondant on your cake, then you'll have to look it up online.  I used fondant for my CTR letters and the border of the shield, and it was a whole new experience for me.  It was my 2nd time using fondant, and my first time using homemade (marshmallow) fondant, and first time using fondant on a cake.  I was sure pleased with the outcome.  And huge thanks to my mom who frosted the cake and helped me get the fondant down.  : )


*Someone once made a violin-shaped cake, and the neck of the violin made it too big for the oven.  My mom ran over to help her (the batter was already inside the cake pan before the lady realized the error) and they left the oven door open a bit so part of the cake was sticking out, and then tinfoiled the opening of the oven.  My mom can fix pretty much anything in a pinch!  So creative.
**I'm assuming you can't freehand the shape onto the cardboard.  If you can, great.  I can, but I still usually don't.  I either grid the cardboard (remember it will get covered with tinfoil later anyway) in pencil and then grid a smaller picture, OR I take my picture in a paint program or photoshop, and make it the size I want it (my current cake was 17x17 at the widest/tallest points).

Then I go in and cut out 8 1/2 x 11 parts of it, starting from left to right, and create individual "parts" of the picture and print them all off.  I then tape those parts together to make the size I want, trim the perimeter, and then use the large-ish paper copy to trace the shape onto the cardboard.

Plus, when I do it that way, I now have this large shape of my picture to use for frosting/fondant purposes.  I totally cut out the insides of mine to make my individual CTR letters and the shield border on this cake.  Please comment to me if you need more help in knowing how to do this part; I didn't think to take pictures of the process.

***UPDATE 6/19/14: I've been asked what "hot dog style" means. When I was growing up, if you folded a piece of paper in half so that it was longer than it was taller (folding over the 8 1/2 inch side on itself), it was called "hot dog style."  If you folded the paper over so that it was more like a blocky rectangle as opposed to a longer, skinny one (folding the 11 inch side over on itself), it was called "hamburger style."  I hope this explanation helps.